I found this great tutorial from Eliza Mets... You can go directly to the following link or just read it right here...
Marirose
http://www.ebsqart.com/Education/Articles/Mixed-Media-and-Collage/9/Live-Studio-Altered-Books/35/
If you've never heard of an altered book before, the concept is pretty simple: take an existing book and make it into art. Period. End of story.
The long version of the definition, though, is much more complex. There are infinite numbers of things you can do with a book form to turn it into something else. Everything from making "just" an embellished or decorated piece of book art to using the book's form in a new way for a completely different purpose or function. (For example, cutting the "guts" of the book out and turning the empty covers into either another book or, say, a purse or frame -- something you wouldn't normally associate with a book form.)
Going over everything you CAN do while altering a book would be just about impossible in a single, short session, so instead, I thought I'd give you the quick-start method for doing a simple altered book in a short period of time. This'll give you a good idea of what's possible. I'm sure your fertile minds can come up with a zillion new ways to go from there.
All right -- here's what you'll need for a basic altered book:
- A book, obviously, and we'll get to how to pick one in a moment.
- basic art supplies -- brushes, your favorite paints and/or mediums, that kind of thing
- scissors
- glue
- a craft knife (like an XActo)
- papers, collage materials, 3-D stuff -- anything you're inclined to use in your "regular" artwork.
- if you want to do the background I show here, you'll need gesso and portfolio water-soluble oil pastels, which are available at places like OfficeMax, cheap.
FIRST STEP:
Get a book. This isn't necessarily as easy as it sounds, but it's not as hard as it sometimes is made out to be.
There are few things you should look for when you're getting started with an altered book:
* Hardcover is better than glue-bound softcovers. This is because soft-bound or glue-bound books are much more likely to fall apart at the seams, leaving you with a nice collection of loose pages that are wonderful pieces of art on their own right, but not quite what you're probably looking for as an altered book.
* If you're worried about exhibiting the book after it's done to your satisfaction, look for books that are OUT of copyright range -- generally speaking, 75 years from publication.
I get mine at library book sales and clearance sales at the local bookstores. Since I generally cover mine up completely (so you can't tell what they were to begin with, other than "A Book" -- I'm not as worried about copyright. If you'll be leaving lots of pages, I'd suggest picking a book that's good & old, just to protect yourself. (Plus, library book sales are cheap, and the money goes to a good cause....new books!)
The one pictured below was from a book warehouse. It's a small book made for children, kind of fat with pages, with thick pages of kraft-type paper, which is why I picked that one. (And I actually cleared them out of stock since they were a buck a piece. The guy thought I was nuts.)
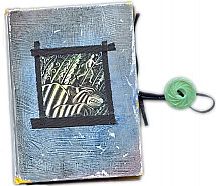
You'll note that in the scan, the cover's already been modified. It WAS a copy of "The Jungle Book", but we sort of changed that a bit.
Speaking of covers -- you don't have to do anything to your cover yet. We'll talk about that at the end.
STEP TWO: PREP-WORK
Generally speaking, most books don't have pages that are thick enough to withstand a whole lot of abuse. (Try giving one to a two-year-old if you don't believe me.) To combat this, the best thing to do is glue pages together. I've done this in a few different ways:
1. With a glu-stick, like UHU, that's archival and easy to use. If you do it this way, work quickly and cover pages all the way to the edge. They -are- more prone to come apart later, so know ahead of time that if your book will get a lot of abuse, you're going to want to use a different method.
2. With brush-on glue. Some use YES! paste (which I'm not fond of because of its quick drying time), or gel medium, which is my personal favorite. If you put it on thinly, it doesn't warp the pages much at all.
Paint on your glue and close the book. When you open it back up (right away), you'll probably have to smooth it out a bit with the edge of a bone folder (bookbinding tool), or the side of a ruler -- that gets out most of your air bubbles and imperfections.
You can glue every few pages together, or leave big gaps of unglued pages between "spreads", or pages on which to put your artwork. I generally do the latter, since you'll sometimes have to remove a few pages here and there to keep your book from puffing out into a sculpture piece when it's done -- it adds more room at the spine so it doesn't "poof", and lays relatively flat that way.
STEP THREE: PAGE PREPARATION
There are tons of things you can do to prepare your pages for work on top of them.
Some people leave them entirely as-is, and use the words as a background in itself, or highlight certain words, so that the artwork and the original book form are fused together in a way.
Alternately, you can paint over part or the whole of the page, so that you can do other types of artwork on top. (Collage being the most popular in the ones I've seen of other artists -- though there's nothing stopping you from doing original paintings or drawings on them, as well.)
My favorite background is a textured one that you can see on the cover above:
1. Paint the page with gesso and let dry. It's okay if there's brushmarks -- you WANT brushstrokes to show.
2. Heat it with a heat gun or let it dry naturally.
3. With Portfolio water-soluble oil pastels, scribble on the page. When you're satisfied with the color combination, heat them again slightly with the heat gun.
4. Working quickly, rub your fingers in a circular motion around the page to work the colors together. Keep "buffing" with your fingertips until the gesso's texture shows through the layer of pastel. (I find it works best to gradually go with lighter and lighter pressure with your fingers, which makes the oil pastel pull away from only the raised areas.)
Keep prepping your pages however you'd like, and we'll move on to adding stuff to the backgrounds next.
STEP FOUR: ADDING STUFF
I'll be honest here -- most of what I do to my books is collage-based. I use a lot of metallic paints as backgrounds (when I'm not doing the oil pastel thing I mentioned before), and most of doing -that- is all about gathering stuff to use on your pages.
Generally speaking, you're going to want to think flat, only because working on the next page can be a pain if there's, say, a computer chip on the previous page or something.
You can attach things to the edges, like this:

All I did in that example was thread wire through rivets (eyelets, actually, the little decorative rivets they're selling through scrapbooking stores now), and wrap it around the nail on the right side of the page. When the book's closed, there's STUFF hanging off the edge. The edge doesn't need to be an end for your work, in other words.
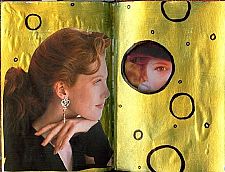
Another interesting technique is to cut through one page so that another can be seen through the hole. In this example, that's exactly what I did. It's not a fully-completed page yet, but it gives you an idea of what's possible:
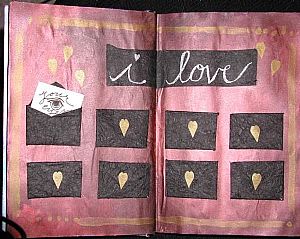
Also, think INTERACTIVE. Since it's a book, and people will have to flip through it to see your work (unless you're in a gallery where it'll only be open to one spread), let 'em find all kinds of hidden surprises. In this example, I added two rows of envelopes, each with a tiny message inside for the viewer:
Keep going until you run out of pages or feel that it's a completed piece. To finish your altered book -- we'll start with covers, since that's often the last thing done, and end there.
STEP FIVE: FINISHING UP
I mentioned that covers are often the last thing done. This is because it's kind of hard to work on the inside pages if you're worried about scuffing the book. In the cover example above, it was done with the oil-pastel/gesso background, added touches of duct tape (in black), and was coated in several layers of gel and matte medium in order to protect it somewhat. I kind of like the beat-up look, myself, but some don't.
Some other things you can do with your covers:
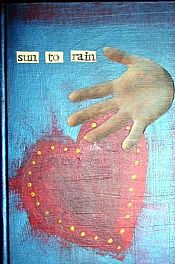
Paint them with straight paint and add your own title/images, like above.
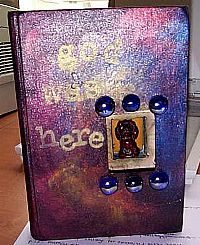
Cut holes in them and add artwork underneath that'll show through, making the covers more interactive, like this: (adding 3-D stuff can make it look shrine-like)
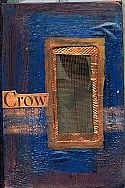
Add screening, so your image underneath is kind of peekaboo-like:
If any of your pages are still tacky when you're done with them, add a piece of waxed paper between them, and you're set -- they won't stick. A light dusting of talcum powder can do the same thing.
Essentially, altered books are done when you say they're done. If you want to leave parts of it art-less, that's fine. If you do every page, that's fine, too -- whatever works with your concept of the piece.
My biggest suggestion when you're finished, though, is to PROTECT your WORK. Whether that's with a layer of varnish or by keeping it in a protective case of some kind -- do it. By the time you're done with the book, chances are it's gone through some hefty stress. Just like other pieces of art, it can get fragile from that -- so make sure you don't lose all that time.
 Posted by