0

Beginning,,,

I keep looking for inspiration and learning from many sites like this one with so meny great information.... I use my blog to shrare with you all my findings.....

From Art Journaling II I share with you their post...

Beginning


Just to let you all know, I have no end point in sight for our journaling adventure together, I don’t want to be in a rush but I also don’t want to drag my feet, either.

I trust that you guys will let me know if I’m going to slow or too fast, if I'm including too much or not enough. I just want your place here, and this is your place, to be somewhere you come to let go and really immerse yourself in a true learning and growing experience.

The real first steps have mainly been covered when you found your journal and gathered your basic supplies. You will find yourself wanting to expand your supply base as you continue to art journal but begin with some of the simple supplies we discussed earlier.

Now it’s time to find a comfortable place to work. A place where you 
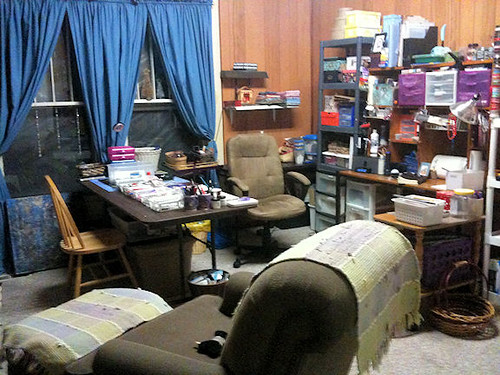
can spread your supplies out, get messy and not have to worry about little hands (if you have them around) getting into anything.
It can be the kitchen table, the coffee table, in your craft room or art studio, it can be on a TV tray with your journaling supplies in a box beside you. It just has to be anywhere you feel comfy.

Now that you’re all settled in, let’s do this…

Everyone has to start somewhere and the blank page is where it all begins. For every single one of us. I remember the feeling of terror that would wash over me in the beginning when I was faced with the blank page. I beg of you…don’t do that to yourself. It is just paper. Nothing but paper.

blank-open-book
The first step for most art journalists is page prep. Think about these things: are your pages thick enough? Do you need/want to *gesso? What the heck is this gesso she keeps mentioning? Altering a book and need to glue pages together? Using thin lined pages that need some extra umph? Just be sure to take care of any of these issues before you move on.

Next step is the background and most of the time, the first step to that is adding color. So, let’s begin by putting some color down on that dreaded blank page…get it over with…you can add color in any way you want. If you have tons of scrapbook paper and want to use some of it as your color base, go for it. Glue it down. Collage different colors and make your page exactly what you want it to be. Don’t be afraid of making a mistake.

Image1Maybe you’re a marker person, by all means, use them to make your pages bright and colorful (or dark and mysterious...go with how you feel.) Or pick 1, 2 or even 3 colors of your craft paint, acrylic paint or break out your watercolors and spread beautiful, wonderful, fabulous color onto your page.

There are so many ways to get the paint onto the page. Of course you can use a brush or, if you’re using craft/acrylic paints, spread them around and cover the page using an old credit card or room key card to scrape the paint onto the page. You can use your fingers to spread it around or a sponge to dab and smoosh it all over the page.

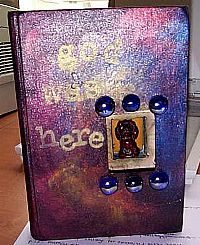
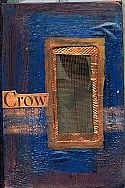
Use some colorful inks and drip them onto the page so they splatter everywhere. Make your colors calm and evenly painted or grungy, scrubbed in and messy…it is your journal so it is your choice.

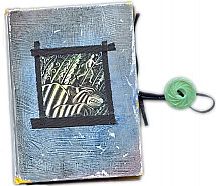
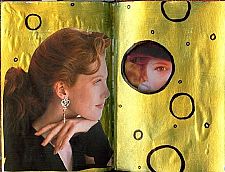
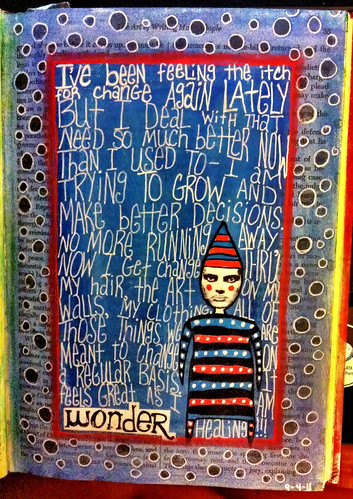
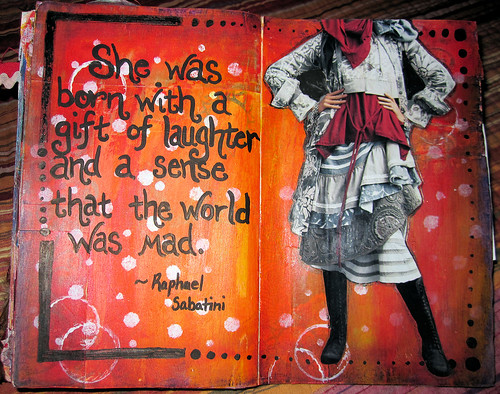
Here are two different pages of mine, one calm and the other a little grungy (I love both!)


What other ways can you think of to add color or basically get your blank page from white (or tan) to a point that you’re not so afraid of it anymore…to a point that the colors excite you and make you want to experiment? Colorful in a way that speaks to you and makes you want to tell your story or reminds you of a quote or song lyric that means something to you. Maybe the colors make you think of that day at the beach or the mountains or in the rain.

A few words of caution…if you plan on writing in a particular place, I would caution you not to use any wax based colors such as watercolor crayons, water soluble oil pastels and even most colored pencils. These can be hard to write over with most pens and will even clog up sharpie permanent markers and, my favorite, Sharpie Paint Pens. Just be aware of that when adding color to your pages. (There are ways around this and we will get to that down the road a bit.)

I love art journaling and realize that when I found it back in 2007, I really found my passion. I have learned not to take things so seriously between the pages of my journals. There really is no such thing as a mistake…just something else to work into that page.

Please don’t let your art journal be a burden or another something to add more stress to your life. Let it be the place that you can come to and unburden your soul, your mind, your energy.

When choosing your colors notice that the colors you choose can speak as to your mood and your inner feelings. I have often noticed that I use reds when I am angry, blues and greens when I’m calm and peaceful, blacks and browns if I am down and depressed, yellows when I’m cheerful or happy.

Last note, I hope that you won’t just do one background of color and stop, waiting on our next step…put a color layer of your choice on a few pages or more. Have fun experimenting with color combinations or different mediums…acrylic one page then watercolor on the next then go ahead and try gluing some great papers down on the next page.

For goodness sake, have fun playing. Remember what it was like to be a kid. Just relax and have a good time in YOUR journal.
0

Live Studio from Eiza Metz

Hi:

I found this great tutorial from Eliza Mets... You can go directly to the following link or just read it right here...

Marirose


http://www.ebsqart.com/Education/Articles/Mixed-Media-and-Collage/9/Live-Studio-Altered-Books/35/


If you've never heard of an altered book before, the concept is pretty simple: take an existing book and make it into art. Period. End of story.

The long version of the definition, though, is much more complex. There are infinite numbers of things you can do with a book form to turn it into something else. Everything from making "just" an embellished or decorated piece of book art to using the book's form in a new way for a completely different purpose or function. (For example, cutting the "guts" of the book out and turning the empty covers into either another book or, say, a purse or frame -- something you wouldn't normally associate with a book form.)

Going over everything you CAN do while altering a book would be just about impossible in a single, short session, so instead, I thought I'd give you the quick-start method for doing a simple altered book in a short period of time. This'll give you a good idea of what's possible. I'm sure your fertile minds can come up with a zillion new ways to go from there.

All right -- here's what you'll need for a basic altered book:

  • A book, obviously, and we'll get to how to pick one in a moment.
  • basic art supplies -- brushes, your favorite paints and/or mediums, that kind of thing
  • scissors
  • glue
  • a craft knife (like an XActo)
  • papers, collage materials, 3-D stuff -- anything you're inclined to use in your "regular" artwork.
  • if you want to do the background I show here, you'll need gesso and portfolio water-soluble oil pastels, which are available at places like OfficeMax, cheap.

FIRST STEP:

Get a book. This isn't necessarily as easy as it sounds, but it's not as hard as it sometimes is made out to be.

There are few things you should look for when you're getting started with an altered book:

* Hardcover is better than glue-bound softcovers. This is because soft-bound or glue-bound books are much more likely to fall apart at the seams, leaving you with a nice collection of loose pages that are wonderful pieces of art on their own right, but not quite what you're probably looking for as an altered book.

* If you're worried about exhibiting the book after it's done to your satisfaction, look for books that are OUT of copyright range -- generally speaking, 75 years from publication.

I get mine at library book sales and clearance sales at the local bookstores. Since I generally cover mine up completely (so you can't tell what they were to begin with, other than "A Book" -- I'm not as worried about copyright. If you'll be leaving lots of pages, I'd suggest picking a book that's good & old, just to protect yourself. (Plus, library book sales are cheap, and the money goes to a good cause....new books!)

The one pictured below was from a book warehouse. It's a small book made for children, kind of fat with pages, with thick pages of kraft-type paper, which is why I picked that one. (And I actually cleared them out of stock since they were a buck a piece. The guy thought I was nuts.)


You'll note that in the scan, the cover's already been modified. It WAS a copy of "The Jungle Book", but we sort of changed that a bit.

Speaking of covers -- you don't have to do anything to your cover yet. We'll talk about that at the end.

STEP TWO: PREP-WORK

Generally speaking, most books don't have pages that are thick enough to withstand a whole lot of abuse. (Try giving one to a two-year-old if you don't believe me.) To combat this, the best thing to do is glue pages together. I've done this in a few different ways:

1. With a glu-stick, like UHU, that's archival and easy to use. If you do it this way, work quickly and cover pages all the way to the edge. They -are- more prone to come apart later, so know ahead of time that if your book will get a lot of abuse, you're going to want to use a different method.

2. With brush-on glue. Some use YES! paste (which I'm not fond of because of its quick drying time), or gel medium, which is my personal favorite. If you put it on thinly, it doesn't warp the pages much at all.

Paint on your glue and close the book. When you open it back up (right away), you'll probably have to smooth it out a bit with the edge of a bone folder (bookbinding tool), or the side of a ruler -- that gets out most of your air bubbles and imperfections.

You can glue every few pages together, or leave big gaps of unglued pages between "spreads", or pages on which to put your artwork. I generally do the latter, since you'll sometimes have to remove a few pages here and there to keep your book from puffing out into a sculpture piece when it's done -- it adds more room at the spine so it doesn't "poof", and lays relatively flat that way.

STEP THREE: PAGE PREPARATION

There are tons of things you can do to prepare your pages for work on top of them.

Some people leave them entirely as-is, and use the words as a background in itself, or highlight certain words, so that the artwork and the original book form are fused together in a way.

Alternately, you can paint over part or the whole of the page, so that you can do other types of artwork on top. (Collage being the most popular in the ones I've seen of other artists -- though there's nothing stopping you from doing original paintings or drawings on them, as well.)

My favorite background is a textured one that you can see on the cover above:

1. Paint the page with gesso and let dry. It's okay if there's brushmarks -- you WANT brushstrokes to show.

2. Heat it with a heat gun or let it dry naturally.

3. With Portfolio water-soluble oil pastels, scribble on the page. When you're satisfied with the color combination, heat them again slightly with the heat gun.

4. Working quickly, rub your fingers in a circular motion around the page to work the colors together. Keep "buffing" with your fingertips until the gesso's texture shows through the layer of pastel. (I find it works best to gradually go with lighter and lighter pressure with your fingers, which makes the oil pastel pull away from only the raised areas.)

Keep prepping your pages however you'd like, and we'll move on to adding stuff to the backgrounds next.

STEP FOUR: ADDING STUFF

I'll be honest here -- most of what I do to my books is collage-based. I use a lot of metallic paints as backgrounds (when I'm not doing the oil pastel thing I mentioned before), and most of doing -that- is all about gathering stuff to use on your pages.

Generally speaking, you're going to want to think flat, only because working on the next page can be a pain if there's, say, a computer chip on the previous page or something.

You can attach things to the edges, like this:


All I did in that example was thread wire through rivets (eyelets, actually, the little decorative rivets they're selling through scrapbooking stores now), and wrap it around the nail on the right side of the page. When the book's closed, there's STUFF hanging off the edge. The edge doesn't need to be an end for your work, in other words.

Another interesting technique is to cut through one page so that another can be seen through the hole. In this example, that's exactly what I did. It's not a fully-completed page yet, but it gives you an idea of what's possible:


Also, think INTERACTIVE. Since it's a book, and people will have to flip through it to see your work (unless you're in a gallery where it'll only be open to one spread), let 'em find all kinds of hidden surprises. In this example, I added two rows of envelopes, each with a tiny message inside for the viewer:


Keep going until you run out of pages or feel that it's a completed piece. To finish your altered book -- we'll start with covers, since that's often the last thing done, and end there.

STEP FIVE: FINISHING UP

I mentioned that covers are often the last thing done. This is because it's kind of hard to work on the inside pages if you're worried about scuffing the book. In the cover example above, it was done with the oil-pastel/gesso background, added touches of duct tape (in black), and was coated in several layers of gel and matte medium in order to protect it somewhat. I kind of like the beat-up look, myself, but some don't.

Some other things you can do with your covers:


Paint them with straight paint and add your own title/images, like above.

Cut holes in them and add artwork underneath that'll show through, making the covers more interactive, like this: (adding 3-D stuff can make it look shrine-like)


Add screening, so your image underneath is kind of peekaboo-like:


If any of your pages are still tacky when you're done with them, add a piece of waxed paper between them, and you're set -- they won't stick. A light dusting of talcum powder can do the same thing.

Essentially, altered books are done when you say they're done. If you want to leave parts of it art-less, that's fine. If you do every page, that's fine, too -- whatever works with your concept of the piece.

My biggest suggestion when you're finished, though, is to PROTECT your WORK. Whether that's with a layer of varnish or by keeping it in a protective case of some kind -- do it. By the time you're done with the book, chances are it's gone through some hefty stress. Just like other pieces of art, it can get fragile from that -- so make sure you don't lose all that time.
0

What is Art Journaling


0

It was a busy weekend


Ive been making couple of Mother's gifts ... Here are some....


0

What I've been doing lately...

Some Mothers Gifts...... Do I love Christy Tomlinson or What????? 


0

Playing ART in my JOURNAL

I' so in love with these techniques.... I Can't take my hands of my journal.....


0

Altered Book Basics: How to Choose the Right Book to Alter

I'm Sharing this post from: http://www.arttradermag.com/how-to/altered-book-basics-choose-book-alter/

Written By Amy L. Sargent
This article originally appeared in ArtTrader Magazine, Spring 2010 Issue 10
The Internet is full of pages that discuss how to alter books and photographs that show off what completed altered book projects look like, but there are very few resources that help someone new to altering books to choose the “right” kind of book to begin their project. That’s where I think sharing a little basic information on book construction can bolster the inspiration and guidelines that the fledgling altered-book artists can locate in many other venues.
This article will cover that very first step of the process—how to find the best book, so that you’re not starting a project that could literally fall apart halfway through the process.
Frankly, I am relatively new to altered books myself. I have only been doing it for a little over a year, and most of what I’ve learned is through trial and error, as well as by spending far too much time drooling over the completed altered books I’ve found on Flickr and through Internet searches.
However, despite my newbie status as an altered book enthusiast and artist, I’ve discovered a gap in most instructions I’ve found for “how to” alter books. Due to a community bookbinding course I took in the early 1990s, and because my MFA in creative writing includes a certificate/specialization in small press operation, I’ve found that I might have a little more knowledge of basic book construction than the average art hobbyist. And it’s been quite handy when trying to bridge the gap between an altered book’s instructions and the final project.
Altered books are a true labor of love, and even the most basic altered book project takes a significant investment of time. In my opinion, it only makes sense, then, to select a book at the outset of the project that will be inexpensive, durable, and attractive, as well as responsive to an artist’s selected medium.
Cost and Availability
First, purchasing a book does not have to be a daunting task, because virtually everywhere, many books wait to be altered. I prefer hardback books with sewn bindings, but these books needn’t be vintage or antique (or expensive). A few great places to find books for around one dollar each are:
  • Library book sales
  • Secondhand stores
  • Dollar stores
  • Flea markets
  • Garage sales
  • The clearance section of your local bookstore
Many bookstores have a box of free books at the doorstep—a perfect place to treasure hunt, because the bookstore owners are thrilled to get rid of them!
And, frankly, you can scan your own bookshelves for a book or two you’re willing to deconstruct. The wonderful thing about altering books is that no one cares if the book is a Reader’s Digest condensed novel, or a cheesy self-help book, or an old algebra textbook. You don’t have to concern yourself with content, which makes purchasing and recycling an inexpensive, “worthless” book a painless procedure.
Durability
Once you settle on a book, don’t just slap down your dollar bill and walk away with your soon-to-become treasure. Take a few minutes to look the book over and determine its durability. Is the binding still strong? Are the covers still in relatively good condition? If the book is ready to fall out of its cover, or if the stitching of the binding appears loose, pass on that book and find another. Altering a book does put stress on a book’s spine—and if you’re already dealing with a delicate binding, you could break the binding halfway through the project, ruining the book.
Take a potential book and hold it by a cover, allowing the pages to hang free. If the binding is strong, the book’s spine will retain its shape [figure 1]. If the binding is weak or broken, a gap will appear between the spine and cover of the book [figure 2]. Put back that book with the weak binding—it’s going to fall apart under the strain of altering.
Choosing a Book to Alter, Figure 1
Figure 1
Choosing a Book to Alter, Figure 2
Figure 2
Choosing a Book to Alter, Figure 3
Figure 3
Also, it is best to choose a book that is comprised of stitched signatures. If you look at the top of the book’s spine [figure 1], you should see a series of little folded booklets—the signatures—that have been then stacked and sewn into the fatter book. Additionally, you want to double-check that these signatures are indeed sewn together. Open the book to the center of one of the signatures, and you should be able to see the stitches at the fold [figure 3]. This binding process holds up to altering in a way that newer, cheaper binding methods (such as thermally activated—or glued—bindings) cannot. In figure 5, you can see how selecting a book with a strong binding allowed me to successfully complete an altered book journal with no worry of the book coming apart.
So, once you locate a book that has a sewn binding comprised of signatures, and a spine and binding that is tight and feels secure, then you’re ready to move on to other considerations.
Aesthetic Appeal
Once you start searching, you will find that the number of inexpensive books with strong bindings is almost astronomical. So, you can start being a little choosier with your purchases—looking at the titles of the books should be part of the thrill of the hunt. Look for titles that take on a new meaning when added to an altered book project, and the possibilities become addictive [figure 4]. I found this little book from the 1950s titled L’Amour at a secondhand shop for 55 cents. The cover is beautifully illustrated—and the inside is full of quotes about love, which I can incorporate into my altered book project.

Choosing a Book to Alter, Figure 4
Figure 4

Choosing a Book to Alter, Figure 5
Figure 5
Also of some importance is the size of the book—in terms of both shape and thickness [figure 5]. You may want to select a thin book of 100 pages or less, especially for a first-time project. Once you begin altering the book, the result might be only 25 pages of art space, which can be quite portable for travel and can be filled quite quickly with art. It’s also satisfying sometimes to choose a book of 300 or more pages and see how the altering process transforms the book into a substantial, impressive brick of altered art.
Responsiveness to Artist Mediums
Frankly, there isn’t much that the altered book artist can do about the pages in a book . . . you’re not going to find a book that was printed on watercolor paper or on Bristol. However, it pays to become familiar with a book’s paper’s tooth, that is, its texture. An older book will have pages with more tooth. Vintage and antique printers didn’t use acid-free paper, so books that are more than 20 years old or so will begin to show some yellowing (or foxing). This older paper will also have more bleed when using markers and paint. Paper in antique books can crumble over time, so the older the book, the more delicate and brittle the pages will be. I try to avoid books that are old enough to have brittle pages.
In contemporary books, paper is usually acid-free. Novels are currently still printed on paper that’s largely wood pulp, so the bleed might still be high, but the yellowing will not be present, and the paper will generally be stiffer and more durable.
However, in many contemporary books, like textbooks, home improvement books, and cookbooks, the paper is glossy finish, which will not work well with colored pencil or markers, but can be much more appealing to a painter armed with a jar of gesso. Glossy pages also work well with some mixed-media techniques, because paint and gesso can be applied and then selectively removed from glossy paper, allowing the book’s original text and images to peek through intentionally.
When purchasing a book with the intent to alter, always flip through the pages, and put your hands on the paper. Feel it. Think about what you plan to add to the book, and determine whether or not the paper’s going to be a good fit. If it isn’t, then walk away.
Choosing a Book to Alter, Figure 6
Figure 6
Final Thoughts
I recently bought a soft cover home décor book at a Dollar Tree written by Brini Maxwell [figure 6]. While it was soft cover, it has thick glossy pages as well as a sewn, signature binding and a great square shape, so I couldn’t pass it up. It’s full of retro images and it’s not too thick . . . I’m not sure what I’m going to do with it, but I know it will be altered eventually.
The three books pictured here came from my local Salvation Army [figure 7]. I splurged—they were 1.75 apiece. I live in a small town, and the book section is not large . . . but on one day, in about fifteen minutes of browsing, I found all three of them. I’m stocked up on books for a while, but all three were great finds! The bindings are like new, the paper quality is perfect, and most exciting part is right on the cover—The Art of Real Happiness, The Big Die and The Birth of Mischief. I couldn’t have asked for better titles!
I keep a little mental checklist when I’m looking at books—price, durability, aesthetic appeal and the tooth of the paper—and the rest is just serendipity. I really hope that these tips help to make book hunting a little easier—and altering those books less frustrating—for you, too.
Choosing a Book to Alter, Figure 7
0

Art Journaling for Beginners By Journal Artista

  A tutorial about different types of acrylic paints and how they will work on a page


0

My first Mini Journal

Myt Home Is full of Love

For me Live is full of art,just fill your heart with ART

My 2 beautiful dugthers.....So proud of them

Look around and be inspired in the beauty of a flower

For my husband I'm his only ROSE
0

7 Links to get you started with ART JOURNAL, By Dina Wakley


Do you art journal?
Are you wondering if you might like art journaling? Maybe you’ve heard about keeping a visual diary and it’s piqued your interest. Or . . . maybe you’re wondering just what these so-called art and visual journals or diaries actually are.
Take a little time to stroll through the links below and get a better understanding of this art form that’s become popular. Art journals offer the opportunity for self expression with no rules. Additionally, their creation lets you to make something from your own hand that is intensely personal and meaningful–something that no one else could create.
So take a look and let us know if you’re feeling inspired to try some art journaling yourself. Or if you’re already making art journals, link us up in the comments!


Dina Wakley: Defining Art Journaling
Aisling D’Art: How I Started My Art Journals
Squidoo Lens by Sammie: A Goldmine of Journal Writing Prompts
Play Design Create: 7 Tips to Build a Treasury of Art Journal Ideas
Flicker Inspiration: Flickr group: Visual Journals
Dina Wakley: Using Art Journal Techniques on Scrapbook Pages
0

Why Keep an Art Journal By Dina wakley

"I sometimes read comments from people who don’t “get” art journaling. They wonder why people would take a blank book and fill it with images and words. I can’t answer for anyone else, but I feel compelled (creatively and emotionally) to art journal. It nurtures my soul–which sounds “new agey” and abstract, but it’s true.
I’ve kept a regular written journal since I was 9 years old (in fact, I still do). I’m a big believer in the value of keeping a journal. I have 18 volumes on my shelf. Sometimes I would sketch or draw in those journals. I’ve always been drawn to art and, eventually, when I was in my early 30s, I couldn’t keep the art suppressed any longer. I started keeping a visual journal in addition to my regular journal, and it fills a need I have for expression and creativity when words alone just don’t cut it. Plus, it’s just plain old fun.
I think artists (and that means you) all have different reasons for keeping journals. The reasons are very personal and individual, and could include:
  • To experiment with art techniques & ideas.
  • To get your thoughts & feelings out on paper in a creative way.
  • To document your life, your being.
  • To enjoy the process of creating.
Think about why you are going to start creating an art journal. And honestly, you don’t have to have any other reason than, “I want to.”

Dina Wakley

I Found this story at: Get It Scrapped

0

What is Art Journal By Dina Wakley

This is my very first post, and in order to make things right and from the very beginning I need to first learn what is an ART JOURNAL. An I found a great artist Dina Wakley who wrote the perfect definition for it. So lets start by learning together. Here's her post:


"Simply put, an art journal is a journal in which you combine art and words to express yourself. That’s it. It’s not complex, and there really aren’t any rules for art journaling. It’s all about self-expression.

Art journaling has a long-standing artistic tradition. Artists through the centuries have kept notebooks in which they sketched, practiced, experimented, and recorded themselves. Vincent vanGogh kept notebooks (and he used moleskins!). Picasso and DaVinci were two other prolific sketchbook keepers. You are in good company! If you feel like exploring famous and not-so-famous artists’ sketchbooks, go to Artists’ Sketchbooks Online.

You might be thinking, I’m not an artist! Well, I beg to differ. You are an artist, and you can create an art journal without drawing or sketching. In fact, I’m lousy at drawing, so I use collage techniques to express myself. Stamp images, vintage photographs and magazine images make up for the fact I can’t draw"


Dina Wakley

SIMPLE RIGHT????...... W'll see.....

Back to Top